

DML EA Flow Zone & Smart Money Zone
The DML EA FZ SMZ is a specialized tool that analyzes DML level behavior to identify dynamic "Flow Zones" (FZ) and "Smart Money Zones" (SMZ), which are areas of stabilization. The Expert Advisor automatically executes trades based on key price points (like the Open, High, Low, and Close) within these zones. This enables strategies for both trend continuation and reversals towards levels considered important by major market players.

Initial Setup
This primary section acts as the master switch for the EA's automated trading functions upon initialization.
- Trading ON on init: This parameter determines whether the Expert Advisor should automatically start placing new trade setups as soon as it is initialized on the chart.
- Setting it to `false` (default): This is the recommended and safer option for live trading. It acts as a critical safety measure. After an accidental platform restart, for instance, the EA will continue to manage any existing orders but will not open new trade setups. This gives you time to verify your settings before manually enabling new trades via the on-chart button.
- Setting it to `true`: The EA will begin analyzing the market and opening new positions immediately upon initialization, without requiring manual intervention.
Important Note: When backtesting in the Strategy Tester, the `Trading ON on init` parameter must be set to `true`. Otherwise, the tester will correctly visualize the levels on the chart, but the robot will not open any positions, making it impossible to verify the strategy's performance.
Global Parameters
In this section, you define the fundamental settings that ensure the Expert Advisor correctly identifies the instrument and synchronizes its time. Proper configuration here is crucial for stable performance.
-
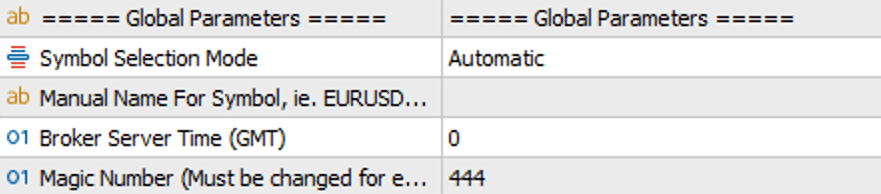
Symbol Selection Mode: Specifies how the EA identifies the financial instrument to trade on.
- `Automatic` (recommended): This is the default setting. The EA will auto-detect the symbol from the chart it is running on. This is the best choice for 99% of use cases.
- `Manual`: This option is for advanced users or when your broker uses non-standard instrument names (e.g., `EURUSD.ecn`, `GBPUSD_x`). It allows you to manually enter the correct instrument name as it appears in the DML databases. This is useful in specific situations, such as running the EA on an instrument with a custom name while wanting it to trade based on a standard instrument (e.g., `EURUSD`).
- Manual Name For Symbol: This field is active only in `Manual` mode. Enter the exact symbol name as it appears in the DML database. Pay close attention to any suffixes or prefixes (e.g., `EURUSD.m`, `DE40.cash`). An incorrect name will prevent the EA from trading.
- Broker Server Time (GMT): All data on the DML servers is published in GMT 0 time. This option sets the time offset between the DML server and your broker's server. It is a critically important parameter as it ensures that the DML levels fetched from the server are correctly plotted on your chart's timeline.
-
Magic Number: A unique identifier for this specific instance of the EA. It acts as the robot's "signature" on every order it places.
- Why is it so important? If you run multiple EAs (or several copies of the same EA) on your account, each instance must have a different Magic Number. Otherwise, the EAs will conflict with each other by trying to manage orders that aren't theirs, which leads to chaos and unpredictable results.
- Good practice: Assign numbers in an organized way, such as `34501` for the first chart, `34502` for the second, and so on.
Proximity Alerts
This feature acts as your personal assistant, notifying you when the price approaches a DML level you are interested in. This allows you to prepare for a potential trade without having to constantly watch the chart.
-
How it works:
The feature requires two steps to activate:- First, you must enable it globally by setting the `Proximity alerts` parameter to `true`.
- Then, on the chart, you need to click the 'A' (Alert) button - or hold down the CTRL key on your keyboard - and then click on the specific DML level you want to monitor. An 'A' will appear above the selected level, confirming that the alert for that level is active.
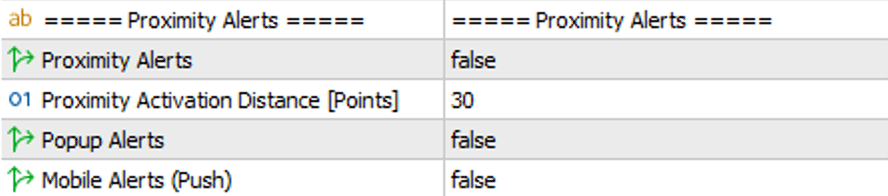
- Proximity alerts: The master switch for the entire proximity alert functionality. If set to `false`, no alerts will trigger, even if activated on the chart.
-
Proximity activation distance [Points]: Specifies how close the price must get to the level to trigger an alert. The value is in points (not pips).
- Example: If a DML level is at 1.08500 and you set the distance to `200` points, an alert will be triggered when the Ask price reaches 1.08300 (for an alert below the level) or the Bid price reaches 1.08700 (for an alert above the level).
- Popup Alerts: Enables the standard alert pop-up window directly on your MetaTrader platform.
-
Mobile Alerts (Push): Enables push notifications to be sent to your phone via the MetaTrader mobile app.
- Important Note: For mobile alerts to work, you must first configure your unique MetaQuotes ID in the settings of your desktop MetaTrader platform (in the menu: `Tools` -> `Options` -> `Notifications`).
Button Parameters
This section allows for full customization of the control panel that appears on your chart. This panel is your command center for quickly managing the visibility of DML levels and activating interactive functions.
- Show Button: The master switch for the entire panel. If set to `false`, none of the buttons described below will be visible.
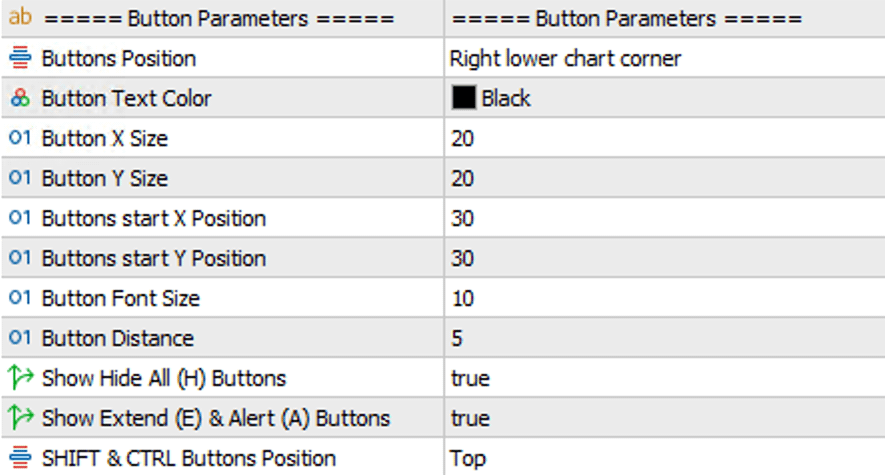
- Buttons Position: Selects the corner of the chart where the panel will be displayed.
- Show Hide All (H) / Extend (E) & Alert (A) Buttons: These parameters allow you to show or hide the individual helper buttons, letting you create a more minimalist panel if desired.
-
Helper Buttons: The panel includes special function buttons that act as interaction modes:
- H (Hide All): A global visibility toggle. A single click hides or shows *all* DML levels at once, overriding the individual settings for each level group. It’s a quick way to clear your chart.
- E (Extend): Activates the "Extend Levels" mode. After clicking 'E' (the button will become bolded), you can click on individual DML lines on the chart to permanently extend them into the future. Clicking the level again will toggle the extension off. To exit this mode, simply click the 'E' button again. There is also a "hidden" function to extend a DML line: click on the desired DML level while holding down the SHIFT key.
- A (Alert): Activates the "Set Alerts" mode. It works similarly to the 'E' button. After clicking 'A', you can click on any DML line to arm a proximity alert for it (using the settings from the *Proximity Alerts* section). There is also a "hidden" function to set an alert on a DML line: click on the desired DML level while holding down the CTRL key.
- Helper Buttons Position: This parameter determines where the helper buttons (H, E, A) will appear relative to the main level buttons (e.g., top, bottom, left, or right).
- Other Appearance Parameters: Use options like `Button X/Y Size`, `Button Text Color`, `Button Font Size`, etc., to precisely adjust the size, color, and spacing of the buttons to match your trading workspace and chart template.

Level Parameters (Levels 1 - 12)
This is one of the key setup elements in the EA. You have 12 independent "slots" at your disposal, each capable of monitoring a different DML level, with a global entry logic applied to all of them. To activate a slot, simply enter the level's name in the DML Level Name field.
The logic for each slot is based on a two-step process:
- Step 1: Detecting Level Continuity - The EA first searches for a period where a given DML level is stable and appears within a narrow range, often precise to the point (1/10 of a pip).
- Step 2: Awaiting a Signal - After confirming the DML level's continuity (known as a Smart Money Zone or SMZ), the EA enters a monitoring mode. It waits for a signal, which occurs when the price approaches the stable DML level. At this point, it prepares a reactive setup on this constant DML level, anticipating a price bounce from it.
- DML Level Name: The name of the DML level to be monitored (e.g., "Snow", "Khaki"). Leaving this field empty deactivates the entire slot.
-
Defining DML Level Continuity (SMZ Zone) (Step 1):
- Levels In Row Minutes: The minimum time - in minutes - during which the EA analyzes the level's history for stability. Once this condition is met-meaning the level's continuity has been maintained for the specified period - the EA begins to monitor price behavior and prepares to deploy a position (setup).
- Level In Row Tolerance [Points]: The maximum allowable distance in points by which consecutive one-minute readings of the level can differ. If a level reading appears outside this defined range, the search for stability and the opportunity to place a setup on that level is terminated.
- How it works together: If you set `Minutes` to `15` and `Tolerance` to `5`, the EA will consider the level "maintained in continuity" if, for the last 15 minutes, the minute-by-minute difference in the level's price never exceeded 5 points. In other words, you are defining a "zone of calm" or a "base" - a Smart Money Zone (SMZ). Very often, for maximum precision, the `Tolerance` is set to `0`.
-
Defining the Signal Window (Step 2):
- Start/Stop Check Time: A global time filter. Defines the general hours (e.g., `08:00-17:00`) during which the EA is permitted to fetch DML levels and analyze the market for this slot. Outside these hours, no DML levels or signals will be considered. Only DML levels from within this time frame will be visible on the chart.
- Start/Stop After Setup (Minutes): A relative time filter. It extends the activity of a reactive level beyond its natural conclusion. It often happens that a reactive level - the SMZ - is not tested during its formation, but the price tests this level after it has ended and reacts dynamically at that price point. This parameter allows you to precisely define the start and end of the window in which the reactive level will remain active after its formation has concluded.

SMZ & FZ Candle Parameters
This is the heart and the most innovative part of the FZ SMZ strategy. The EA does not react to single DML level values but analyzes their behavior over time, identifying two key market states:
- SMZ (Smart Money Zone): Periods where a DML level is very stable and repeats at the same price level. This represents liquidity zones honored by large market participants ("Smart Money").
- FZ (Flow Zone): Periods where the DML level changes value rapidly, "jumping" from one place to another. This represents dynamic movement, impulse, and a shift in liquidity levels.
The EA groups these periods and creates "virtual candles" from them, which represent an entire market phase. This section allows you to decide which of these phases should generate a trading signal and which specific price point from that virtual candle should be used.
How a Virtual Candle is Created
- Open: The opening price of the first one-minute candle on which the given phase (SMZ or FZ) began.
- Close: The closing price of the last one-minute candle on which the given phase ended.
- High / Low: The highest and lowest prices reached by the market during the entire duration of the phase.
Parameters
-
Candle Mode: Choose which type of market phase should be analyzed for a signal.
SMZ_Candles: The EA will look for signals based on stability zones (SMZ).FZ_Candles: The EA will look for signals based on impulse zones (FZ).
-
Used Candle Price Mode: After identifying the appropriate "virtual candle" (FZ or SMZ), this parameter determines which specific price point from that candle will be used as the base level for opening a setup.
OPEN_Price/CLOSE_Price: The open/close price of the virtual candle.OPEN_CLOSE_50_Price: The midpoint of the virtual candle's body.HIGH_Price/LOW_Price: The highest/lowest point of the virtual candle (its wicks).HIGH_LOW_50_Price: The midpoint of the virtual candle's entire range (50% from High to Low).
Example in Practice:
Imagine a DML level remains at 1.10000 for 20 minutes (an SMZ phase) and then, in a single minute, jumps to 1.10500 (the beginning of an FZ phase).
- If you select
SMZ_Candlesmode and theHIGH_Price, the EA will treat the highest market price reached during the 20-minute stability period as the key level that the price must reach to settle the setup. - If you select
FZ_Candlesmode and theOPEN_Price, the EA will treat the opening price of the M1 candle on which the jump to 1.10500 occurred as the base level for settling the entire setup at the Take Profit (TP) level.
FZ & SMZ Strategy Parameters
This section contains global filters that influence the logic of opening positions. These settings apply to all active DML level slots and act as a final verification before any setup is activated.
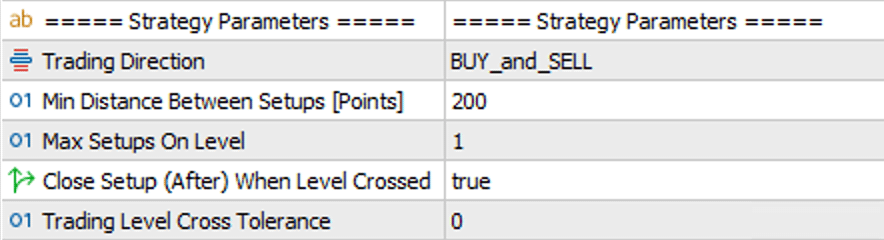
- Trading Direction: A global filter for trade direction. It allows you to restrict the EA to only BUY or only SELL positions. This is useful when you want to trade exclusively in line with the overall, long-term market trend.
- Min Distance Between Setups [Points]: The minimum distance in points that must be maintained between a newly opening setup and any other already existing on the chart. This prevents opening too many positions in close proximity.
- Max Setups On Level: The maximum number of setups that can be opened based on a signal from the same "virtual candle" (the same FZ/SMZ phase). A setting of `1` allows you to capitalize on only the first, potentially best, opportunity.
- Close Setup (After) When Level Crossed: An additional "signal freshness" filter. If enabled (`true`), the EA will check if, after the signal was generated (i.e., after the FZ/SMZ phase has ended), the price has already touched or crossed the designated settlement level. If so, the setup will not be opened, as the signal is considered "tested" or outdated.
- Trading Level Cross Tolerance [Points]: This parameter is intrinsically linked to the option above. It defines a buffer zone around the level. A value of `0` means that even the slightest touch of the level will invalidate the signal, while a positive value (e.g., `10`) allows for a minor breach of the level without canceling the setup.
Setup Parameters / Lot Size
This key section allows you to precisely define what size the opened positions will have and how the EA will initiate and manage the entire lifecycle of a trading setup.
Setup Lifecycle Management
These parameters control how long a setup is active and under what conditions it is removed.
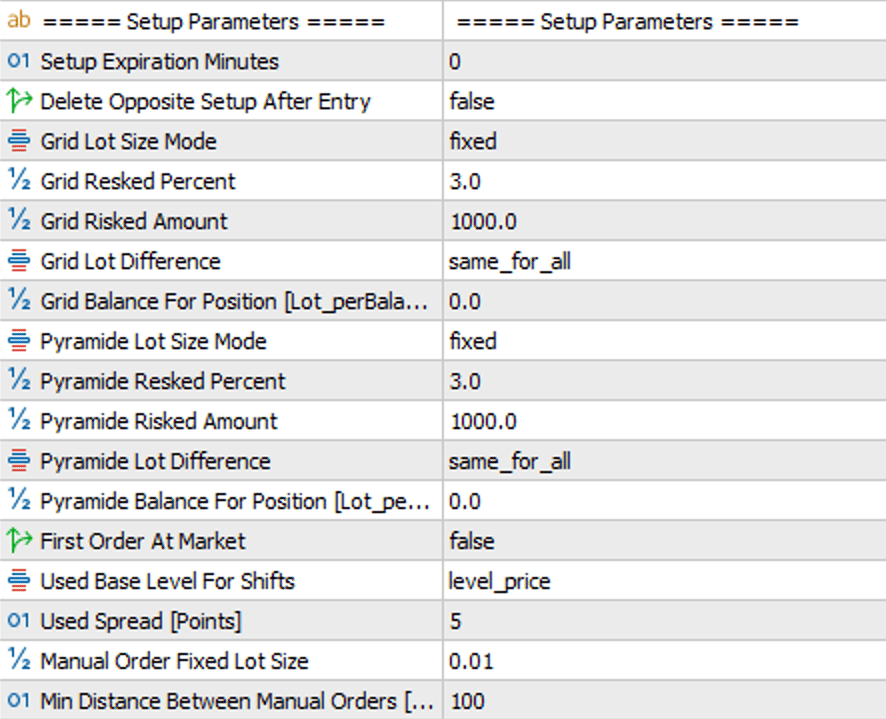
- Setup Expiration Minutes: The time in minutes after which an inactive setup (a set of pending orders) will be automatically deleted. A value of `0` means the orders will never expire - unless they are deleted for another reason. Setting a specific value (e.g., 120 minutes) prevents catching old signals that may have lost their relevance.
- Delete Opposite Setup After Entry: If set to `true`, the activation of one setup (e.g., SELL) will cause the automatic deletion of all pending orders for the opposite setup (BUY). This prevents holding open positions in both directions simultaneously from the same signal.
Lot Size Management
Choose the method by which the robot will calculate the trade volume. These settings are separate for Grid orders (against the direction of price movement) and Pyramid orders (with the direction of price movement).
-
Lot Size Mode (for Grid and Pyramid):
- `fixed`: The simplest method. The EA will use the exact lot values you manually enter in the Position Size... fields in the Grid and Pyramid sections.
- `Lot_perBalance`: Volume is calculated dynamically based on the account balance. In the Balance For Position field, you specify what amount of the balance corresponds to the base lot size (e.g., 0.01).
- Example: If your balance is $10,000 and you enter `5000` in the Balance For Position field, the EA will open a base position of 0.02 lots ($10,000 / $5,000 * 0.01).
- `Risk_from_Balance / Equity / Amount`: The most advanced modes. The EA will automatically calculate the position size for the entire grid so that if the Stop Loss is hit, the total loss will not exceed a set percentage of your capital (Resked Percent) or a specific amount (Risked Amount).
- Example: You have a $10,000 account and set the risk to 2% of the balance (Resked Percent). The maximum loss for the entire setup cannot exceed $200. The EA will calculate the total volume of all orders in the grid so that their simultaneous closure at the Stop Loss results in a loss as close as possible to $200.
- Very Important Note: If a trader is using a small account and the risk analysis determines that the positions within the setup should be smaller than 0.01 lots (the minimum possible position size), the EA will still open positions of 0.01 lots. This can result in a loss much larger than originally intended. This function is excellent, but the account size and the distance to the Stop Loss are critically important here.
- Lot Difference (for Grid and Pyramid): Determines whether subsequent positions in the grid have the same volume (`same_for_all`) or if their size is a multiplier of the base position (`multiplier_for_baseLot`), which allows for Martingale-style strategies.
- Manual Order Fixed Lot size: A fixed lot size for trades opened manually via the on-chart panel.
- Min Distance Between Manual Orders: The minimum distance in points that must be maintained between manually added orders to a setup.
Entry Settings
- First Order At Market: Determines whether the first order in a setup is a pending (`false`) or market (`true`) order. Setting to `true` is useful when you want to enter the market immediately after a signal, without waiting for a specific level to be reached. Setting to `false` allows for entering positions at price levels that are precisely correlated with the DML levels.
- Used Base Level For Shifts: Defines the reference point for calculating the distances of subsequent grid orders. This is crucial in cases of price slippage.
- `level_price`: Distances are always calculated from the original DML level. This ensures the grid remains constant, regardless of the first position's entry price.
- `first_order_price`: Distances are calculated from the actual entry price of the first position. The grid dynamically adjusts to the "new market reality."
- Used Spread [Points]: The spread value in points used by the EA for internal calculations (e.g., when placing orders). This is particularly important for SELL orders, as closing them at the Take Profit level can be difficult during nighttime hours when the spread widens significantly. This variable is also important in the Strategy Tester to simulate real market conditions and ensure orders are not rejected due to being too close to the market price.
MMD Grid Orders Filter
This advanced filter acts as an intelligent safety brake for your grid of orders. Its purpose is to prevent adding subsequent orders to the grid when the market is moving in a strong, one-directional trend that is contrary to the direction resulting from your strategy.
This filter only activates after the initial number of orders, defined in the Open Pending Grid Number parameter (in the Grid Orders section), has been opened.
Example: If Open Pending Grid Number is set to 2, the first two grid orders will be opened unconditionally. The MMD filter will only start verifying market conditions from the third grid order onwards.
-
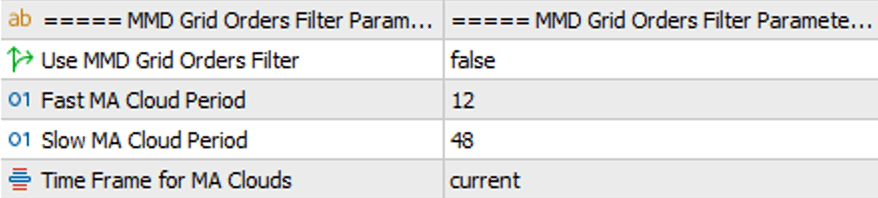
Use MMD Grid Orders Filter: The main on/off switch for the filter. Setting it to
trueactivates filtering. The filter is based on the MMD methodology, created by Mariusz Maciej Drozdowski. You can find more about this methodology on MagicOnCharts.com. -
Fast & Slow MA Cloud Period: These define the periods for two moving average clouds. The EA creates a "cloud" (a zone) by using two types of moving averages (SMA and EMA) of the same period. Such a zone, unlike a single line, is more resistant to market noise and provides a more stable view of the trend.
- Fast Cloud: Reacts more dynamically to price changes.
- Slow Cloud: Smooths out price movements, indicating a more long-term direction.
- Time Frame for MA Clouds: Specifies the time interval on which both moving average clouds are calculated. This allows the trend analysis to be based on a different time horizon (e.g., H1) than the one the Expert Advisor is running on (e.g., M5).
Filter Logic in Practice:
The MMD filter analyzes the relative position of the clouds to assess whether adding another order to the grid is justified.
- To open a subsequent BUY order from the grid, the fast cloud must be above the slow cloud (suggesting a potential return to an uptrend).
- To open a subsequent SELL order from the grid, the fast cloud must be below the slow cloud (suggesting a potential return to a downtrend).
If the condition is not met (e.g., the EA wants to open a BUY position, but the clouds indicate a strong downtrend), the order will not be opened, even if the price reaches its level. The EA will wait until the cloud configuration becomes favorable. In short, this filter is designed to protect your account from the uncontrolled expansion of a grid in unfavorable market conditions.
Grid Orders Parameters
This section defines the mechanics of building a grid of orders. A grid involves opening subsequent orders at specified intervals as the price moves contrary to the direction of your initial position. The main goal is to average the entry price, which means a smaller price movement in the desired direction is needed to achieve profit.
-
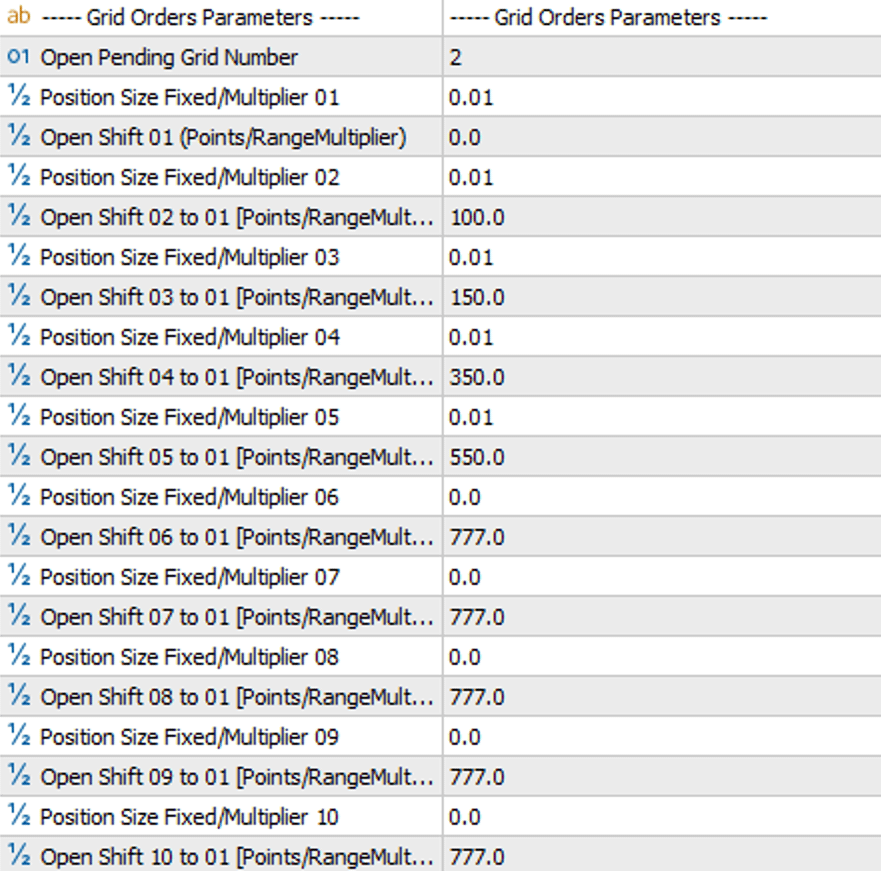
Open Pending Grid Number: A key parameter for managing the grid construction. It determines how many pending orders from the grid are placed on the market immediately after a signal appears.
- How it works: If you set this value to
2, the EA will place only the first two orders from the grid onto the market. The remaining orders (from 3 to 10) are not added automatically. They will be added one by one, only when the price reaches their respective levels and market conditions permit (according to the MMD filter for Grid positions). - Logic for adding subsequent orders (from 3 onwards):
- MMD filter disabled: The EA will unconditionally add the next pending order as soon as the price touches its defined level.
- MMD filter enabled: To add the next order, two conditions must be met simultaneously: the price must touch its level, AND the MMD cloud formation must align with the order's direction.
- How it works: If you set this value to
- Position Size Fixed/Multiplier 01 ... 10: Here you define the lot size for each of the up to 10 levels of the grid. If you only want to use 5 orders, leave the value 0.0 in fields 06 through 10.
-
Open Shift 01 ... 10 [Points]: This is where you specify where the pending orders will be placed. The distances are given in points.
- Open Shift 01: Defines the distance of the first order from the base DML level. A value of
0means the first order will be placed exactly on that level. - Open Shift 02 to 10: Define the distance of subsequent orders from the same base point (i.e., from the DML level or the opening price of the first position, depending on the
Used Base Level For Shiftssetting).- Important: This is not the distance from the previous order! If
Open Shift 02is 100 andOpen Shift 03is 150, it means the second order will be 100 points from the base, and the third order will be 150 points from the base.
- Important: This is not the distance from the previous order! If
- Open Shift 01: Defines the distance of the first order from the base DML level. A value of
Pyramid Setup Parameters
Pyramiding is a strategy of adding more orders as the price moves in the direction of your open, profitable position. The goal is to maximize profits during a strong trend that aligns with your expectations. It is a powerful tool for scaling winning trades.
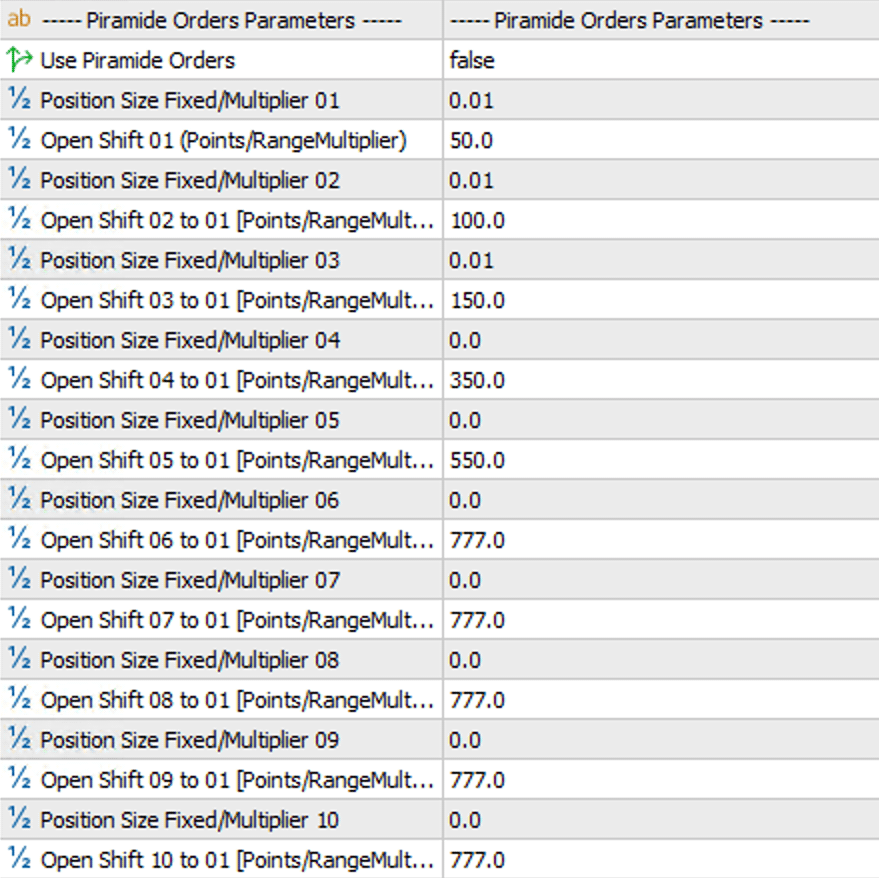
- Use Piramide Orders: The master on/off switch for the entire pyramiding function.
-
Start Piramide From Position Nr: Specifies after which Grid position's activation the pyramiding strategy should be launched.
- Example: If you set this to
1, the pyramid will activate as soon as the first position from the grid is opened. If you set it to3, the EA will wait for three grid positions to be opened before it starts building the pyramid.
- Example: If you set this to
- Move Piramide with Next Grid Position: Dynamically moves the entire pyramid structure. When the next grid order is opened, the entire pyramid (all its pending orders) is moved, and its levels are recalculated based on the price of the most recently opened grid order. This allows the pyramid to "follow" the developing grid.
- Start New Piramide with Next Grid Position: A more aggressive form of position scaling. When the next grid order is opened, the EA does not move the existing pyramid but instead starts an additional, independent pyramid sequence from this new order. This results in building multiple pyramids, each with a different base.
-
Position Size & Open Shift (P01 ... P10): These parameters work analogously to those in the Grid section, with the key difference that distances are calculated in the profitable direction.
- Important: Just like in the grid,
Open Shift P01is the distance from the base, andOpen Shift P02throughP10are the distances of subsequent orders from the same base, not from the previous order.
- Important: Just like in the grid,
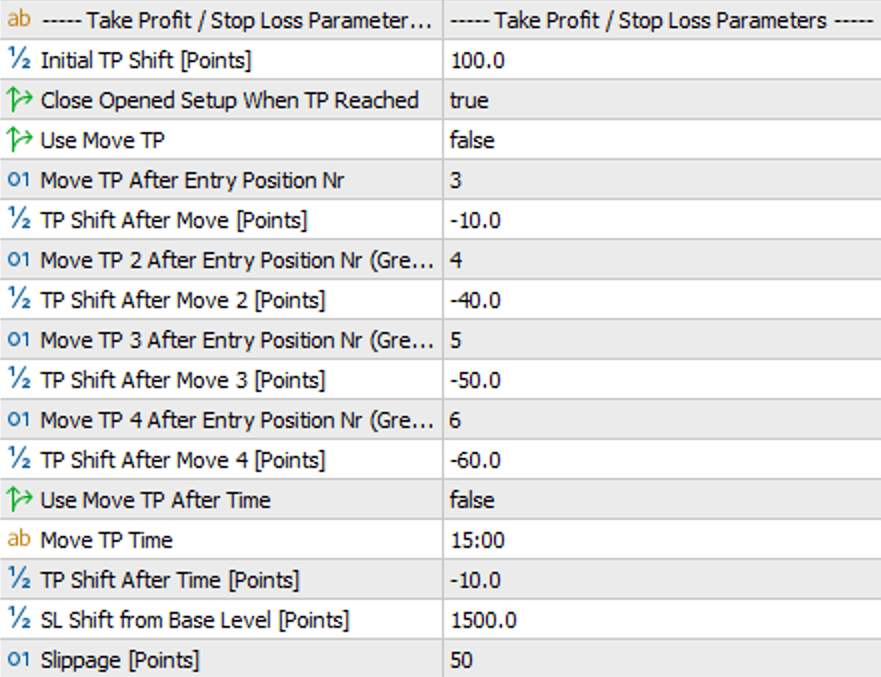
TP & SL Parameters
This is the heart of risk and profit management for every setup. All orders within a single grid share one common Take Profit level and one common Stop Loss level. This means that when one of these levels is triggered, the entire group of positions will be closed simultaneously - including orders from the pyramid and orders added manually to the setup (using the Setup Management Panel).
Take Profit (TP)
- Initial TP Shift [Points]: Sets the initial profit target for the entire setup. This distance is measured in points from the base price (according to the
Used Base Level For Shiftssetting). -
Close Opened Setup When TP Reached:
true(default): When the TP level is reached, the EA will delete all pending orders belonging to that setup - even if no position from the setup has been filled.false: The EA will maintain all pending orders until at least one position is filled and then either the Take Profit or Stop Loss level is hit.
-
Use Move TP (Dynamic TP shift based on position count): This feature allows you to dynamically move the TP level as the grid expands, which is useful for securing profit or minimizing risk.
- How it works: After a specific number of positions are opened (e.g.,
moveTPAfterEntryNr= 3), the common TP will be shifted by a specified value (TPAfterMove01). You can define up to 4 such thresholds. - Important Note: The TP level shift can be triggered by positions from both the Grid (identified as values 1 to 10) and the Pyramid (identified as values 11 to 20).
- Important: The shift value (
TPAfterMove) can be negative. A negative value (e.g., -50 points) means moving the TP closer to the Break-Even price, often to a small loss level, to "salvage" a position when the market is moving strongly against you.
- How it works: After a specific number of positions are opened (e.g.,
-
Use Move TP at Time (Dynamic TP shift at a specific time): Allows for the TP to be moved at a set broker time.
moveTPTime: The time at which the modification should occur (e.g., "22:50").TPatTimeShift [Points]: The value in points - relative to the base level (Used Base Level) - by which the TP will be moved. This is useful for tightening the TP before the market closes or during periods of increased volatility.
Stop Loss (SL) & Slippage
-
SL Shift from Base Level [Points]: Sets the distance of the Stop Loss order in points.
- Key Information: This distance is calculated from the
Used Base Levelthat initiated the entire setup. This ensures a constant and predictable level of risk, regardless of how many positions from the grid are opened.
- Key Information: This distance is calculated from the
- Slippage [Points]: The maximum allowable price deviation (slippage) in points when an order is executed. This protects against opening a position at a much worse price during high market volatility.
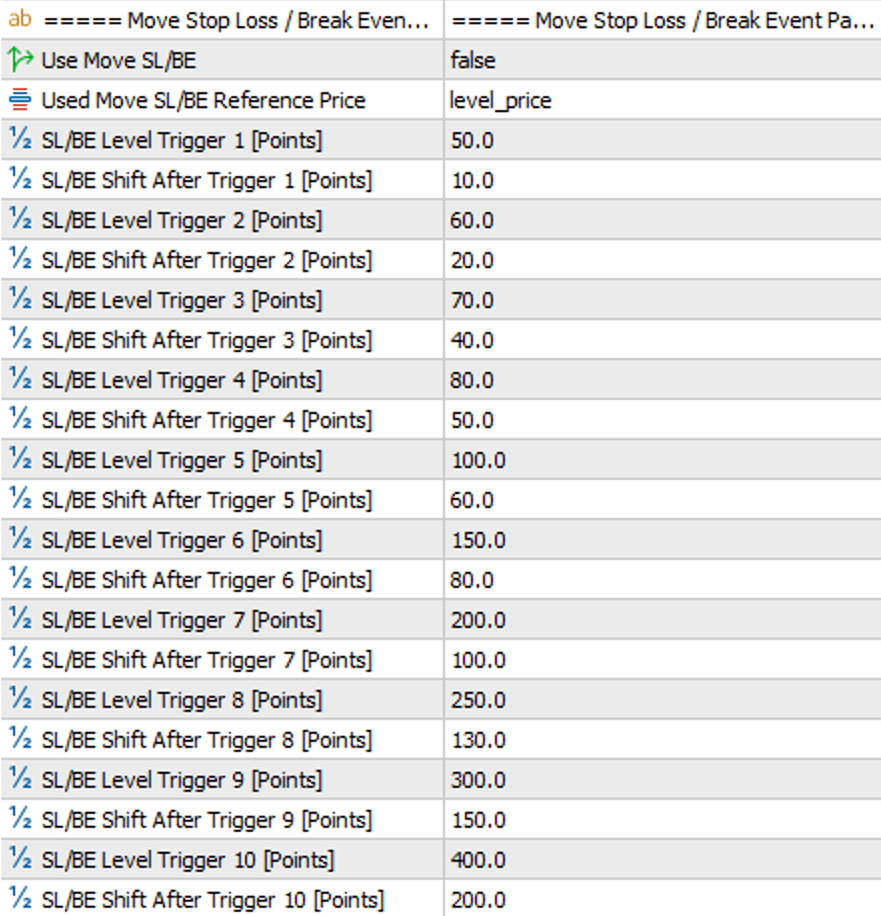
Move SL / BE Parameters
This function is an automatic guardian of your unrealized profits. Its purpose is to dynamically move the Stop Loss level as the price moves in your favor. This allows you to "lock in" a portion of the profit, reduce risk to zero (Break-Even), or even guarantee a minimum profit, all without your intervention.
The logic is based on simple "if-then" condition pairs: if the price reaches a specified profit level X (Trigger), then move the Stop Loss to level Y (Gain). You can define up to 10 such thresholds.
- Use Move SL/BE: The main on/off switch for the entire function.
-
Used Move SL/BE Reference Price: A key parameter that defines the reference point from which all distances will be calculated (for both Trigger and Gain).
level_price: The reference point is the original, fixed DML level that generated the signal. This provides predictable, consistent protection levels.first_order_price: The reference point is the actual opening price of the first position in the grid. This is a dynamic approach that adapts to potential price slippage.
- MoveSLTrigger01 ... 10 [Points]: The "trigger" or activation threshold. This is the distance in points that the price must move away from the reference point (generating profit) to activate the Stop Loss shift.
-
MoveSLGain01 ... 10 [Points]: The new location for the Stop Loss. This is the distance in points from the same reference point to which the SL will be moved after being activated by its corresponding Trigger.
- A positive value (e.g.,
10) means locking in a small profit. - A value of
0means setting the SL to the Break-Even (BE) level. - A negative value (e.g.,
-20) means moving the SL closer, but still at an acceptable loss level.
- A positive value (e.g.,
Example in Practice:
Let's assume a BUY position, and the Reference Price is 1.20000.
- You set:
MoveSLTrigger01= 100,MoveSLGain01= 20. - When the market price reaches 1.20100 (a 100-point profit), the
Trigger01condition is met. - The EA immediately moves the Stop Loss to the 1.20020 level (base price + 20 points).
- From this moment on, your position has a guaranteed 20 points of profit, even if the price reverses.

Trailing Stop Parameters
A Trailing Stop (TS) is a flexible safety net that automatically follows the price as it moves in a profitable direction. Unlike the `Move SL` function, which shifts the Stop Loss in steps after reaching specific thresholds, the Trailing Stop does so continuously, allowing profits to run while protecting the gains already made.
The EA allows you to define two stages for the Trailing Stop's operation, enabling you, for example, to tighten it as profits increase.
- Use Trailing Stop Function: The main on/off switch for the entire function.
- TS_Start01 / TS_Start02 [Points]: The activation threshold. This is the profit level in points (calculated from the price of the lowest-filled position from the Grid), which, when reached, will activate (for Start01) or modify (for Start02) the Trailing Stop.
- TS_Dist01 / TS_Dist02 [Points]: The trailing distance. This specifies the distance in points at which the Stop Loss will follow the peak price reached by the market after the Trailing Stop has been activated.
-
TS_Close_mode: Defines the conditions under which the Trailing Stop can close positions.
TS_close_all: Standard mode. When the price reverses and hits the Trailing Stop level, the EA will close all positions belonging to the setup, regardless of whether their combined result is positive or negative.TS_close_only_profitable: A safer mode. After the Trailing Stop level is hit, the EA will close only the positions that are currently profitable. This prevents a situation where a TS activated on a small profit closes the entire setup with an overall loss.
- TS_Line_style / color / width: Parameters that allow you to customize the appearance of the Trailing Stop line on the chart for better visualization.
Example in Practice:
Let's assume the price of the lowest-filled position from the Grid for a BUY setup is 1.10000.
- You set:
TS_Start01= 200,TS_Dist01= 100. - The price rises to 1.10200 (a 200-point profit). The
Start01condition is met, and the TS activates. - The EA immediately sets the SL to 1.10100 (200 points of profit - 100 points of distance). You have now locked in 100 points of profit.
- The price continues to a new high of 1.10250. The SL follows it, moving up to 1.10150 (always 100 points behind the peak).
- The market reverses, and the price falls to 1.10150. The positions are closed with a 150-point profit.
Safe Profit & Risk Functions
Additional modules designed to protect capital and secure profits in dynamic market conditions. They act as automatic safety fuses for your strategy.
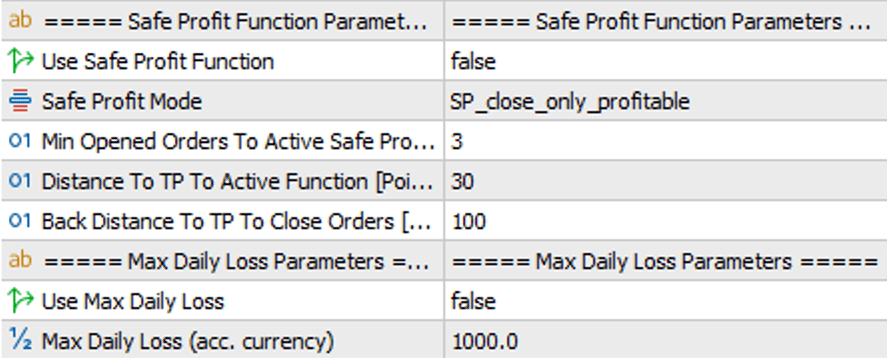
Safe Profit Function
This function acts like an intelligent Trailing Stop that only activates near the established Take Profit target. Its purpose is to protect the majority of the profit when the market gets close to the TP but then suddenly reverses.
Step-by-step logic:
- Arming: The function "arms" itself when the price approaches the Take Profit level to within the distance defined in
maxDistToTpToActiveFunction, provided the minimum number of orders (minOpenedOrdersToSafeProfit) is open. - Triggering: Once armed, if the price retreats from the TP zone by a distance greater than defined in
distToTpBackToCloseOrders, the EA will close positions to secure the profit.
- Use Safe Profit Function: The main on/off switch for the function.
-
Safe Profit Mode: Determines which positions are closed when the function is triggered.
SP_close_all: Closes all positions in the setup.SP_close_only_profitable: Closes only profitable positions.
- Close on profit only X times: Limits how many times the
SP_close_only_profitablemode can be used for a single setup. A value of1means that after closing profitable positions once, subsequent activations will close the entire setup. - Min Opened Orders To Active...: The minimum number of open positions required for the function to activate.
- Distance To TP To Active... [Points]: The maximum distance from the TP at which the function "arms" itself.
- Back Distance To TP To Close... [Points]: The maximum distance the price can retreat from the TP zone - after the Safe Profit function is activated - at which the positions will be closed.
Max Daily Loss
The ultimate safety net that protects your account from excessive losses within a single trading day.
- Use Max Daily Loss: The main on/off switch for the function.
- Max Daily Loss (in account currency): The maximum allowable loss for the day, expressed in your account's currency.
- How it works: When the sum of realized losses for the day reaches the defined limit, the EA will stop opening new setups for the remainder of that trading day.
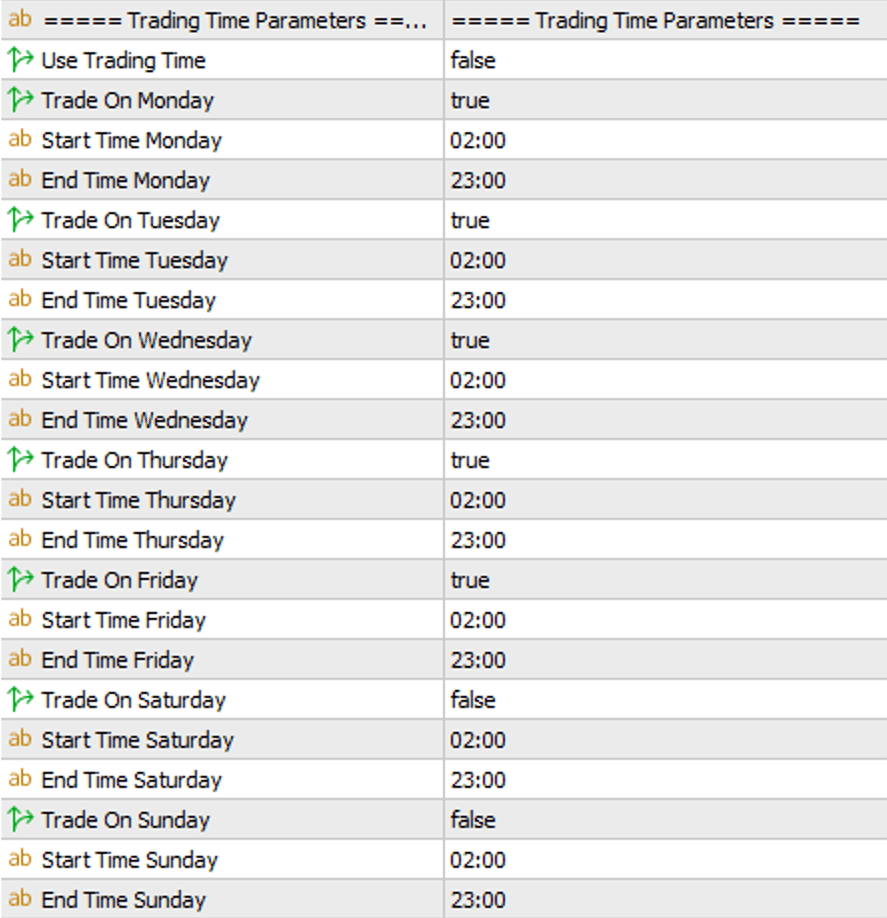
Trading Time Parameters
A time filter is a powerful tool that allows you to precisely adapt the EA's operation to specific trading sessions, avoiding periods of low liquidity or increased risk.
Main Trading Windows
This filter defines the "allowed" time windows during which the EA is permitted to initiate new setups.
- Use Trading Time: The main on/off switch for this filter.
- Trade On Monday ... Sunday: Allows you to enable or disable trading on specific days of the week.
-
StartTime / EndTime (for each day): Defines the exact start and end times for trading (according to the broker's server time) for each active day.
- How it works: Outside of the defined hours, the EA will not open any new setups. Already open positions will continue to be fully managed according to their SL, TP, and other function settings.
- Strategic Application: Use this filter to limit trading, for example, to only the London and New York sessions (e.g., from 09:00 to 18:00), avoiding trading at night.

Exclude Time Parameters
This filter works in the opposite way to the Main Trading Window. Instead of defining when the EA should trade, here you specify a "forbidden" time zone during which the robot should stop opening new setups. This function is ideal for precisely excluding short, risky periods during the day.
- Use Level Exclude Time: The main on/off switch for this filter.
-
ExcludeStartTime / ExcludeEndTime: The hours between which the EA should stop opening new setups.
- How it works: If you define a window from
23:00to01:30, the robot will stop initiating new trades just before midnight and resume an hour and a half into the new trading day. Already open positions will continue to be fully managed. - Overnight Break Handling: The filter correctly interprets windows that cross midnight. If
ExcludeEndTimeis earlier thanExcludeStartTime(e.g., 23:00 to 01:30), the function will work correctly as an overnight break. - Strategic Application: The most common use is to exclude the period of low liquidity and high spreads during the market rollover (the transition from one trading day to the next). It can also be used to avoid trading during regular macroeconomic data releases.
- How it works: If you define a window from
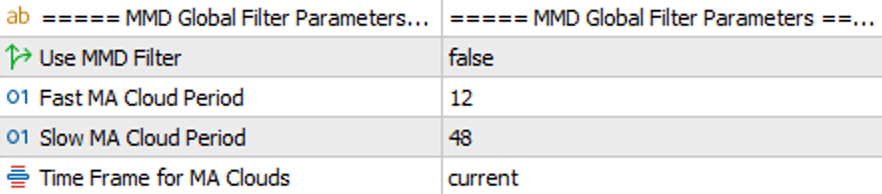
MMD Global Filter Parameters
This filter acts as the primary gatekeeper for your strategy. Its purpose is to verify the overall market trend before any setup is even considered. Unlike the MMD Grid Orders Filter, which operates during the expansion of a grid, this global filter decides whether a signal from a DML level has any chance of being executed at all.
- Use MMD Filter: The main on/off switch for the filter.
- Fast & Slow MA Cloud Period: These define the periods for the two moving average clouds. These parameters work identically to those in the grid filter - the fast cloud represents short-term momentum, while the slow cloud represents the long-term trend.
- Time Frame for MA Clouds: Specifies the time interval on which both moving average clouds are calculated. This allows you to base your main trend analysis on a higher timeframe (e.g., H1) while trading on a lower one (e.g., M5).
Filter Logic in Practice:
The filter analyzes the relative position of the clouds to give a "green light" for a potential setup.
- The EA will only consider opening a BUY setup if the fast cloud is above the slow cloud.
- The EA will only consider opening a SELL setup if the fast cloud is below the slow cloud.
If the condition is not met, the signal from the DML level is completely ignored, and the EA takes no further action related to that signal. Use this filter to trade exclusively in the direction of the dominant trend, which can significantly increase the probability of success and help you avoid opening positions "against the current."

Position Control Panel
This optional panel is your manual command center, giving you the ability to quickly intervene and manage positions opened by this specific EA instance.
-
Show Positions Control Panel: The main on/off switch for the panel. Set to
trueto display it on the chart.
Note - Beta Version: This panel's functionality is currently in the beta phase and is provided for testing purposes only. A full, detailed description of all its features will be included in the next version of the user manual.

Download
To download the latest version of this tool, go to the Download section in your client panel.
Go to the Download section